The roots of non-destructive testing can be traced to ancient civilizations, such as checking the metallic material’s sound using a ringing sound. The question posed in front of Archimedes to determine the amount of gold in the King’s Crown without destroying it required non-destructive evaluation. However, the development of modern engineering has mandated more sophisticated testing techniques.

Table of Contents
What is Non Destructive Testing (NDT)?
Non destructive testing (NDT) is a method of evaluating the components for defects and flaws without affecting the future usefulness or serviceability of the components. NDT reveals the flaws in the structure of the components.
Principle of NDT
The basic principle of Non Destructive Testing is subjecting the material under test to specific physical characteristics, observing and interpreting the response to detect flaws. The entire principle depends on the variation of response of sound and unsound zone of the components. Through the observation of this differential behavior, the integrity of the material under the test can be evaluated. The physical properties that may be employed are magnetic permeability, electric conductivity, acoustic impedance, radiation absorption, etc.
Importance of NDT
The NDT method is very crucial for quality control and monitoring at various stages of manufacturing, fabrication, and production. NDT methods are also employed to test or monitor the condition of in-service components for reusability. Non-destructive testing can be employed to monitor the quality in the following:
- Raw material for the production of various components
- Intermediate goods employed to produce final products
- Finished product before putting it into service
- In-service components to evaluate for reuse or repurpose
Benefits of NDT
Employing NDT methods reduces manufacturing costs and increases safety. This helps boost sales and the reputation of the manufacturer. Some of the benefits of NDT are:
- It reduces the overall cost of production by reducing scrap, preventing failures, and conserving material and labor
- It increases safety by arresting failures and ensuring the soundness of the material
- It helps in the periodic monitoring of in-service components, thereby increasing the reliability and trust of customers or end users
- It can reduce or avoid forced shutdown of plants by preventing failures through periodic monitoring
Conventional Techniques of Non-Destructive Testing
Non-destructive testing (NDT) includes a range of techniques to detect surface and internal flaws in materials. Visual testing (VT) is the simplest, using direct inspection for visible defects, while Liquid Penetrant Testing (PT) and Magnetic Particle Testing (MT) detect surface flaws that are not easily visible. More advanced methods like Ultrasonic Testing (UT) use sound waves to identify internal defects, and Radiographic Testing (RT) uses X-rays or gamma rays to produce images of internal structures. Eddy Current Testing (ECT) detects surface and near-surface flaws through electromagnetic induction. Combining these methods ensures a thorough evaluation of material integrity.
Visual Testing
Visual testing (VT) is a common and powerful non-destructive testing (NDT) method that relies on proper illumination and the tester’s eyesight. Although often overlooked, it requires specialized training in product knowledge, service conditions, and acceptance criteria. VT includes direct, remote, and translucent visual inspection. Tools such as portable lights, mirrors, hand lenses, and magnifiers are commonly used. For internal inspections, borescopes and fiber-optic systems allow remote surface examination, often with cameras for recording. All defects found through other NDT methods must ultimately be confirmed by visual inspection.
Applications of visual testing include checking surface condition, alignment, component shape, evidence of leaks, and internal defects.
Liquid Penetrant Testing
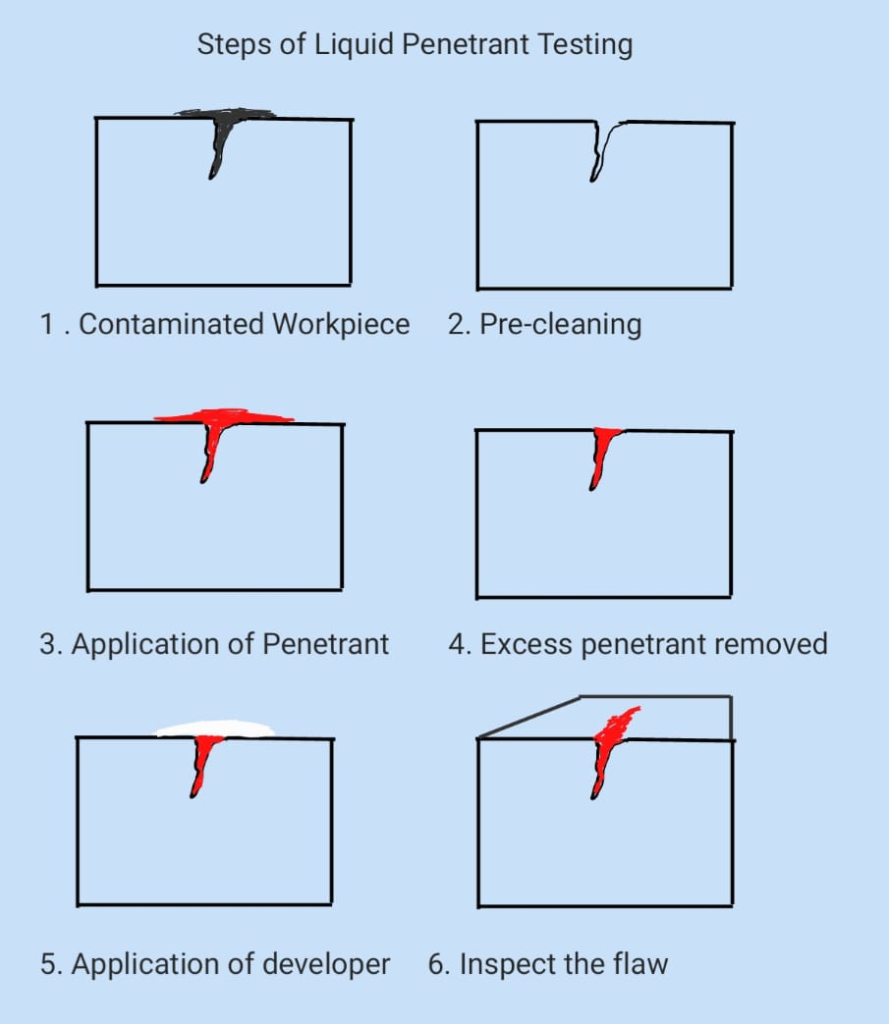
Liquid penetrant testing is used to detect surface discontinuities in non-porous, non-magnetic materials. The basic principle of Liquid penetrant testing is capillary action or surface tension. A liquid penetrant is applied, and after a set time, the excess penetrant is removed. A developer is then applied, which absorbs the penetrant left in the discontinuity, revealing its presence, location, size, and nature. The method uses either visible dye (inspected under white light) or fluorescent dye (inspected under UV light). Penetrants can be water-washable, post-emulsifiable, or solvent-removable. The most sensitive method is post-emulsifiable fluorescent dye penetrant, followed by other types.
Advantages include low cost, portability, high sensitivity, simplicity, and applicability to various materials. Limitations of liquid penetrant testing include the need for a clean surface, detection of surface discontinuities only, unsuitability for porous or rough surfaces, the requirement to remove all penetrant materials, and the lack of an easy method for permanent record-keeping.
Magnetic Particle Testing
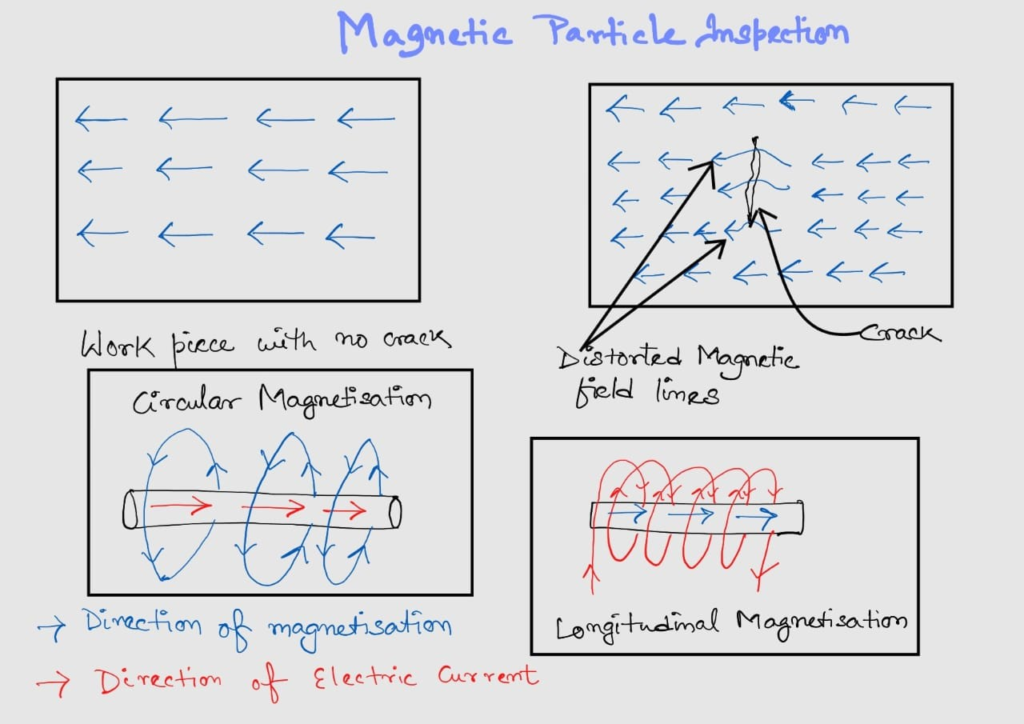
Magnetic particle testing is used to detect surface and near-surface flaws in materials that can be magnetized. The specimen is magnetized using a permanent magnet, electromagnet, or electric current. Flaws disrupt the magnetic field, causing magnetic lines of force to exit and re-enter, creating magnetic poles. When magnetic particles are applied, they gather at these poles, visually indicating the flaw’s size and shape.
In magnetic particle testing, magnetization techniques are categorized as follows:
- Direct Current Techniques: Current flows through the test specimen, and the resulting magnetic field is used to detect defects.
- Magnetic Flux Flow Techniques: Magnetic flux is induced into the specimen using a permanent magnet or by passing current through a coil or conductor.
Magnetic particle testing offers several advantages, including minimal pre-cleaning and its effectiveness in detecting fine, shallow surface cracks in ferromagnetic materials. It is a fast, simple, and generally inexpensive method that works through thin coatings and is suitable for various specimen sizes and shapes. The technique is also highly portable, making it convenient for on-site inspections, and providing quick results.
However, this method has some limitations. It only works on ferromagnetic materials, and the orientation and strength of the magnetic field are critical for accurate detection. Additionally, it only detects surface and near-surface flaws. Large currents may be required, posing a risk of “burning” test parts. Furthermore, parts often need to be demagnetized, which can be a difficult process.
Ultrasonic Testing
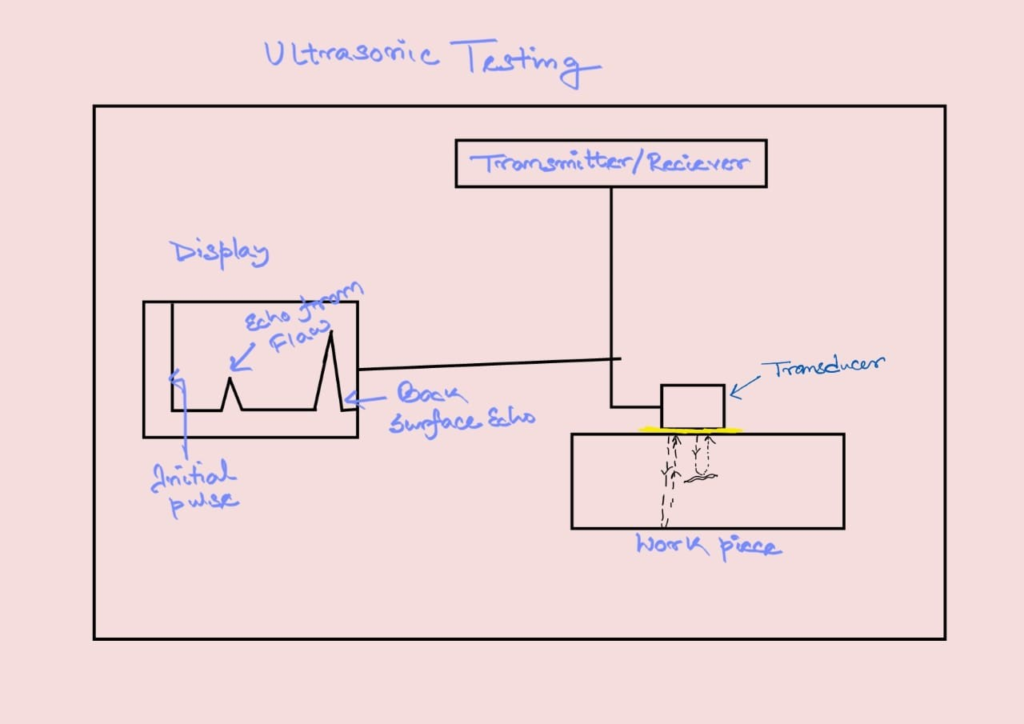
Ultrasonic inspection is a non-destructive testing method that introduces high-frequency sound waves (0.5 to 20 MHz) into a material to detect flaws. The sound waves travel through the material, and their intensity is measured either after reflecting off an interface (pulse echo) or after passing through to the opposite surface (pulse transmission). The degree of reflection varies depending on the material at the interface, with near-total reflection at metal-gas boundaries and partial reflection at metal-liquid or metal-solid interfaces. This method has superior penetrating power, allowing detection of flaws deep within materials, such as up to 6-7 meters in steel. Ultrasonic testing is widely used for flaw detection, thickness measurement, determining mechanical properties, and evaluating material processing.
Advantages of ultrasonic testing include its high sensitivity, which enables the detection of small defects, and its ability to penetrate thick sections of material. It also offers high accuracy in determining the position and size of flaws and has a fast response time, allowing for rapid and automated inspections. Additionally, it only requires access to one surface of the specimen, making it versatile for a variety of applications.
Some limitations of ultrasonic testing include difficulties with specimens having unfavorable geometry or undesirable internal structures, which can hinder inspection accuracy. The method requires a couplant for sound wave transmission, and the probe must be properly coupled during scanning. Defect orientation also affects detectability.
Additionally, ultrasonic testing equipment is expensive and requires highly skilled operators. Calibration and reference standards are necessary for accurate results, and rough surfaces may pose problems, making surface preparation essential.
Eddy Current Testing
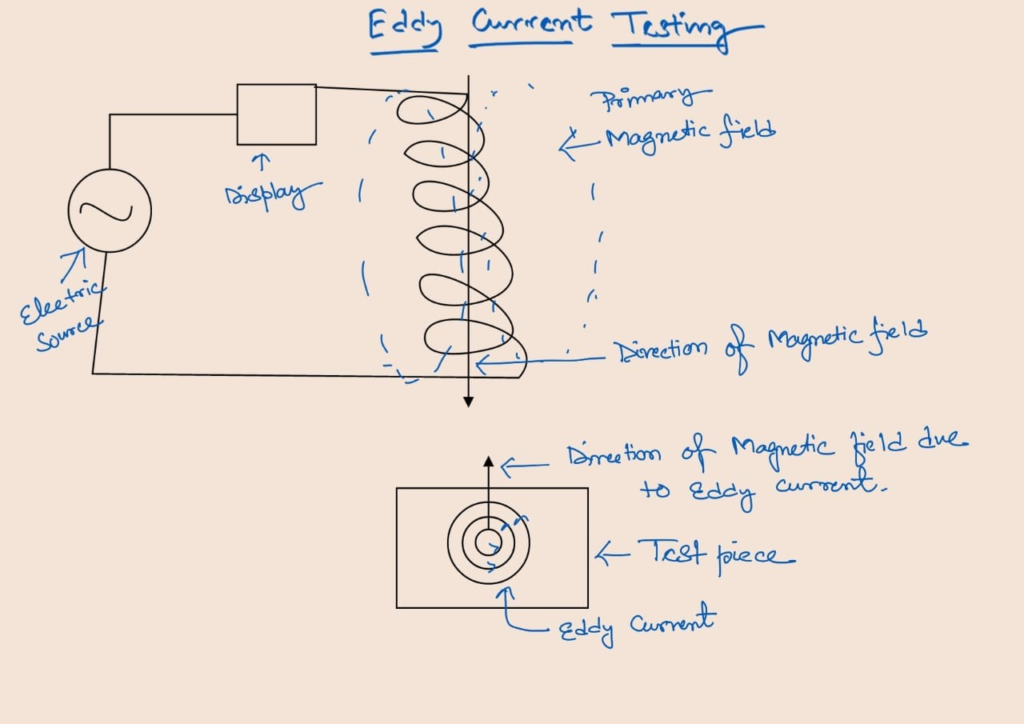
Eddy Current Testing is a non-destructive testing method that utilizes the principle of electromagnetic induction. This method can be used for electrically conductive materials only. In this method eddy current is produced in the component under inspection using a coil carrying alternating current. In balanced conditions, the magnetic field produced by the eddy current is nullified by the magnetic field of the coil. The presence of a flaw or crack distorts the magnetic field produced by the eddy current. This is recorded via a read-out computer system. This method can be employed to detect surface flaws, measure case depth and wall thickness, or determine the coating thickness.
The advantages of Eddy Current Testing are extreme sensitivity to flaws, high accuracy, ease of setup and use, high scanning speed, very repeatable results, and instantaneous response. However, it has some disadvantages as well, such as, it can not be employed for non-conducting materials, extreme sensitivity to surface irregularities requires good surface finish, does not provide good results for carbon steels, detectability is affected by orientation of eddy current along the flaw or crack. Apart from that good background academic background in electrical principles is also required.
Radiographic Testing
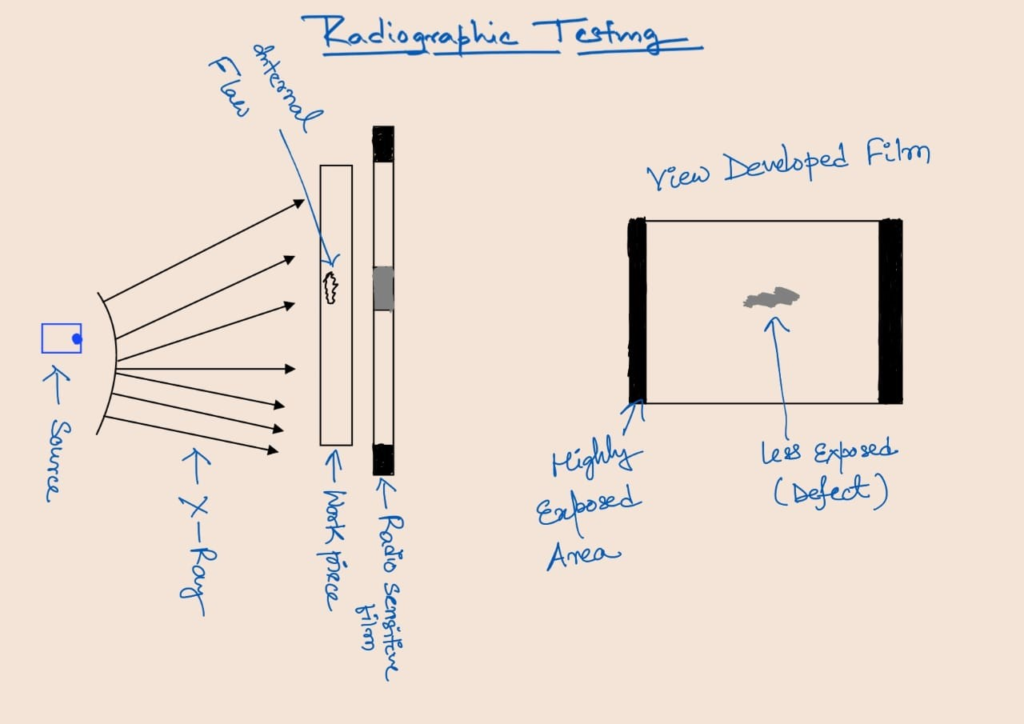
Radiographic testing is a non-destructive method used to detect internal flaws in various materials by passing X-rays or gamma rays, typically from Co-60 or Ir-192 radioisotopes, through the specimen. A radiographic film is placed behind the test specimen to capture a shadow image, known as a radiograph, which reveals the internal structure and helps identify potential flaws. This method is widely used for inspecting products such as forgings, castings, and weldings. One of its key advantages is that it allows large areas to be inspected in a single exposure and is suitable for a variety of materials.
Additionally, radiographic testing can detect internal flaws in structures, misassemblies, or misalignments. It also provides a permanent record, requires no on-site calibration and quality-checking devices are available. Furthermore, the interpretation of radiographs can be performed comfortably in controlled conditions, adding to its practicality. Despite its advantages, radiographic testing has several limitations. First, the use of X-rays and gamma rays poses significant health risks. Additionally, this method struggles to detect planar defects and requires access to both sides of the specimen. The thickness range that can be inspected is limited, and certain areas may be impossible to radiograph due to geometric constraints. As the thickness of the specimen increases, the sensitivity of the inspection decreases. Radiographic testing is also more expensive, difficult to automate, and demands considerable skill for accurate interpretation of radiographs. Moreover, it does not indicate the depth of discontinuities.
Conclusion
Non destructive testing has emerged as a promising tool to arrest failures and ensure the safety and integrity of engineering materials. It may be described as an interdisciplinary scientific method of quality assurance and monitoring for industries like automobiles, atomic energy, aerospace, aeronautics, railways, defense, construction, etc. The growth of manufacturing will further boost the demand for Non-destructive testing in the future.


1 thought on “6 Major Techniques of Non Destructive Testing”